
Before you start
vfopro runs your analyses with OpenSeesPy, which needs a Python environment on your computer. vfopro does not bundle Python — it drives one you provide, so install that first.
- A Windows PC — the installer is a
.exe. - An internet connection — for sign-in and for the one-time OpenSeesPy install.
- Miniconda (or Anaconda). Install it now if you don't have it, then create a conda environment for vfopro to use — any name works.
- An AI provider key — optional. Only needed for the AI assistant.
Install vfopro
-
Save the installer, run it, and follow the prompts.
-
Launch vfopro. The sign-in screen appears.
Sign in or create an account
- Already have an account? Enter your email and password and click Log In.
- New here? Switch to the Create Account tab, enter your name, email, and a password (at least 8 characters), then click Create Account.
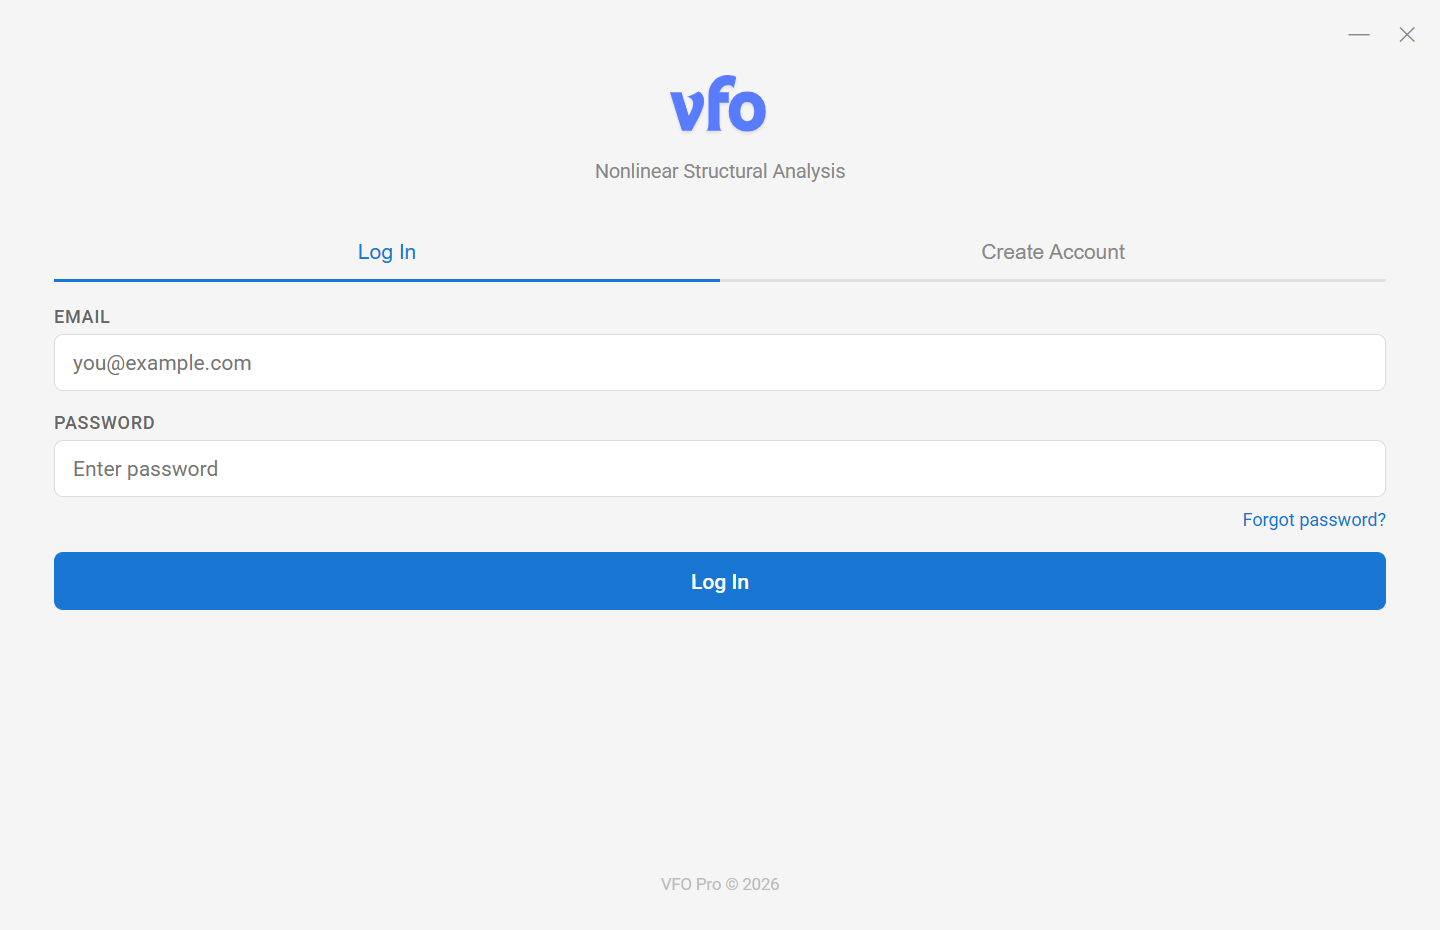
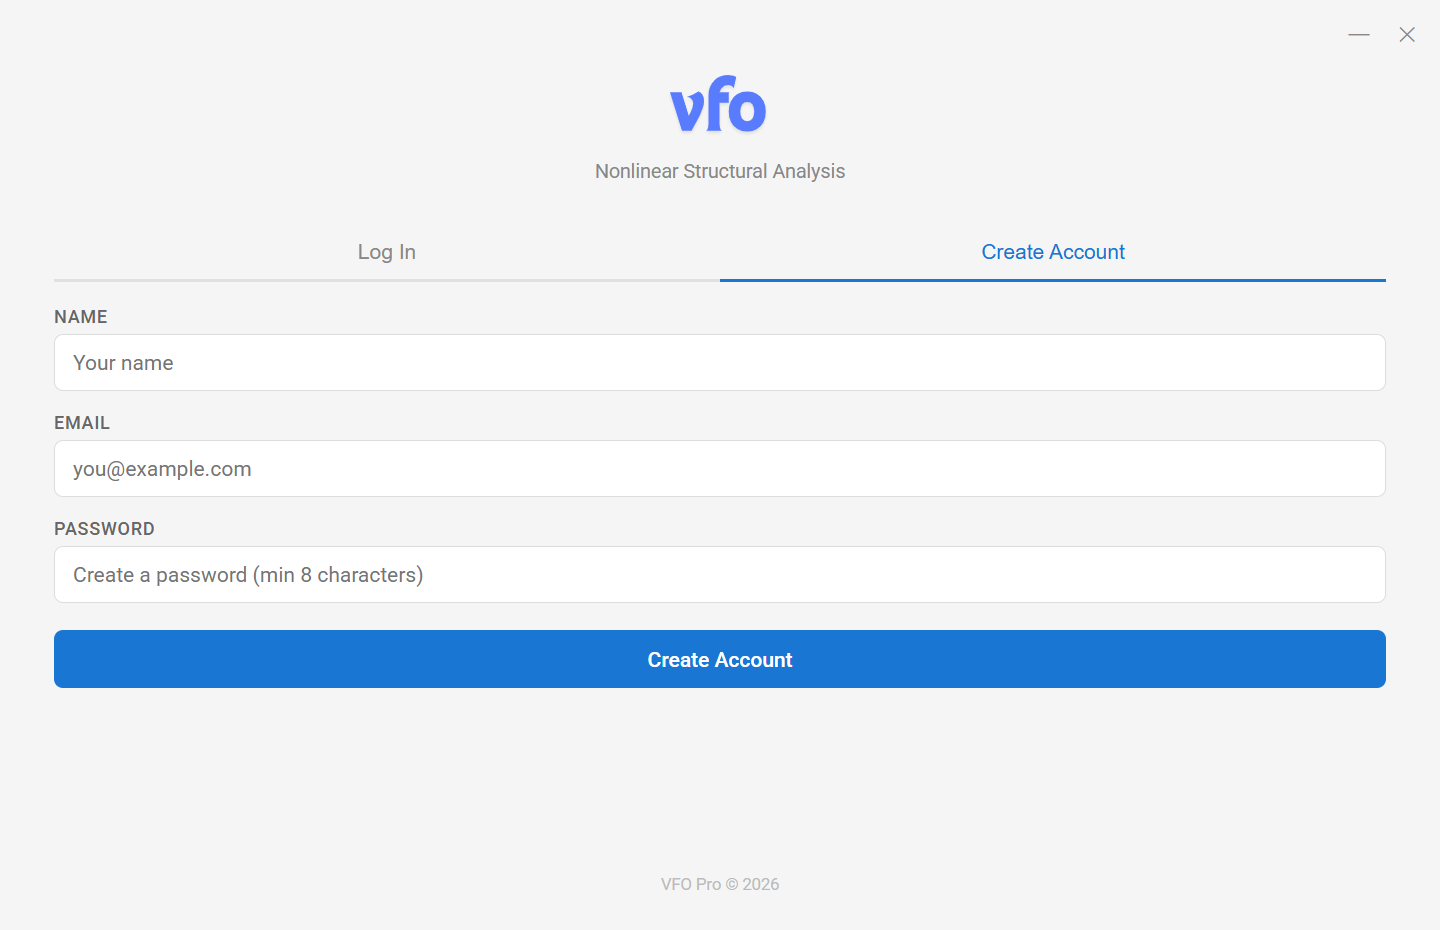
New accounts start on a free trial. If your trial ends, vfopro prompts you to upgrade before you can continue.
The first-run setup checklist
The first time you sign in, vfopro shows a Welcome to VFO Pro checklist with two setup steps.
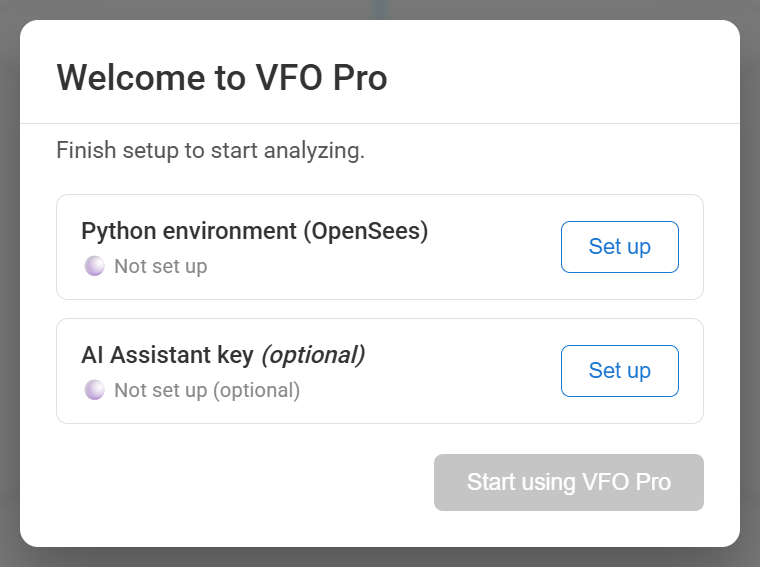
- Python environment (OpenSees) — required. Analysis can't run without it.
- AI Assistant key — optional. Only needed for the built-in AI assistant.
- Start using VFO Pro stays disabled until step 1 is done.
The checklist appears only once. If you skip a step and close it, finish later from Settings — see Change these later.
Set up your Python environment
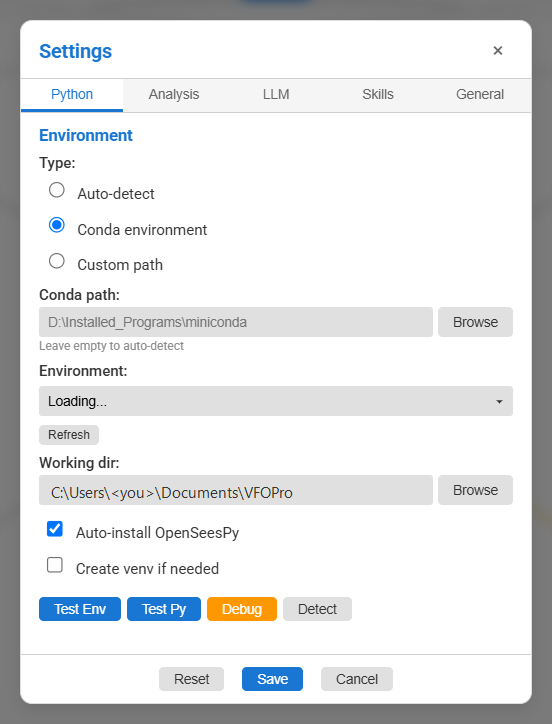
Click Set up next to Python environment (OpenSees). Settings opens on the Python tab. (You can also open it any time from the gear icon in the bottom-right corner of the main window.)
-
Under Environment › Type, choose how vfopro should find Python (see the table below). Conda environment is recommended.
-
For a conda setup, point Conda path at your Miniconda/Anaconda install (leave it blank to auto-detect), click Refresh, then pick your environment from the Environment dropdown.
-
Set Working dir to the folder vfopro should use for scratch files (it defaults to
Documents\VFOPro). Leave Auto-install OpenSeesPy checked so vfopro can install missing packages for you. -
Click Test Env — covered in the next section.
Which environment type should I pick?
| Type | Use it when |
|---|---|
| Conda environment (recommended) | You installed Miniconda or Anaconda. Point Conda path at it, click Refresh, and choose your environment. |
| Auto-detect | You'd like vfopro to search common install locations for a working Python. |
| Custom path | You're not using conda. Point directly at a python.exe. |
Verify OpenSeesPy is installed
Click Test Env. vfopro checks your Python version and confirms openseespy can be imported. If it's missing, vfopro asks permission before installing it — along with its own vfopro output-processing package. The first install takes about 2–3 minutes.
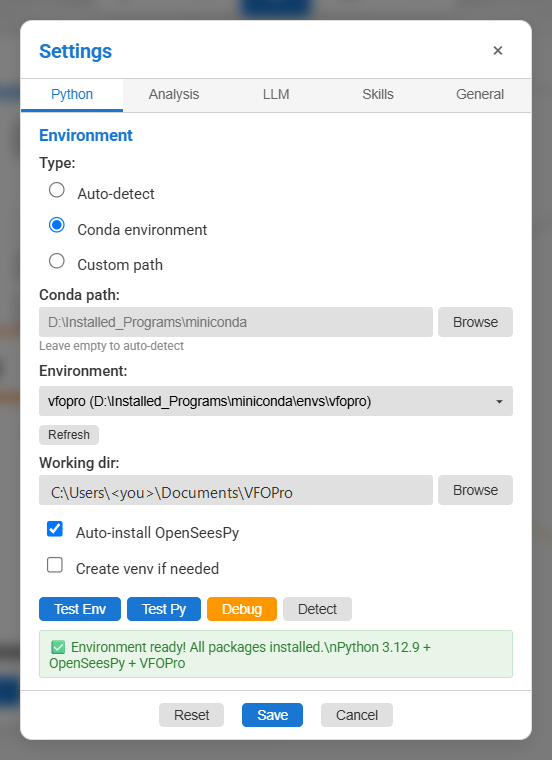
Need more detail? Three helper buttons sit next to Test Env:
- Test Py — a per-package check (
openseespy,numpy,matplotlib) to diagnose a specific failure. - Debug — dumps raw version and import output for troubleshooting.
- Detect — searches for non-conda Python installs.
Analysis › Check Model is a separate feature. It validates your model data (duplicate nodes, missing sections, and so on) and doesn't touch Python or OpenSeesPy.
Add an AI key (optional)
Skip this if you don't plan to use the AI assistant yet — modeling and analysis work fully without it. To set it up now, click Set up next to AI Assistant key, or open Settings and switch to the LLM tab.
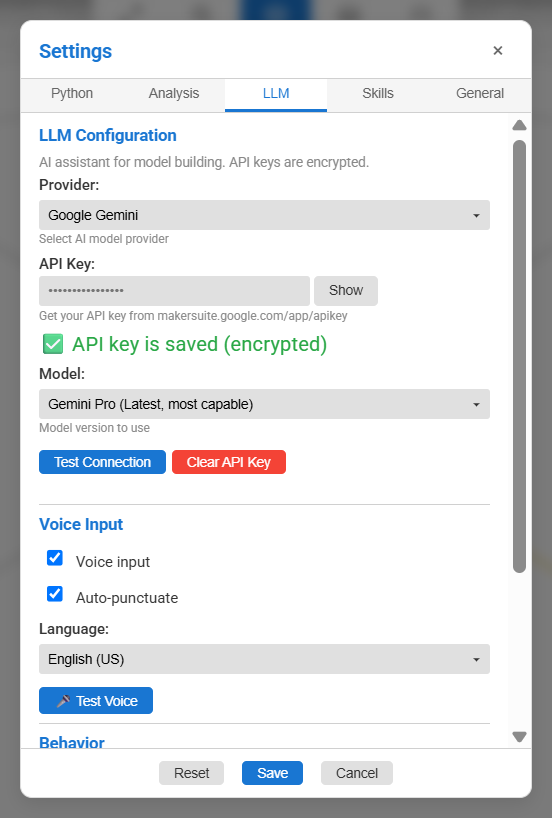
Pick a Provider: OpenAI (ChatGPT), Google Gemini, or Anthropic Claude.
-
Get an API key from that provider's console — the tab shows the right link for the provider you pick:
- OpenAI:
platform.openai.com/api-keys - Google Gemini:
makersuite.google.com/app/apikey - Anthropic Claude:
console.anthropic.com/account/keys
Paste it into API Key (use Show to double-check what you typed).
- OpenAI:
Pick a Model for that provider from the dropdown.
-
Click Test Connection, then Save.
You should see: “API key is saved (encrypted)”.
Your key is encrypted at rest. You can switch providers, or remove a saved key with Clear API Key, at any time.
Finish setup
Once your Python environment shows Ready, the checklist's Start using VFO Pro button becomes clickable.
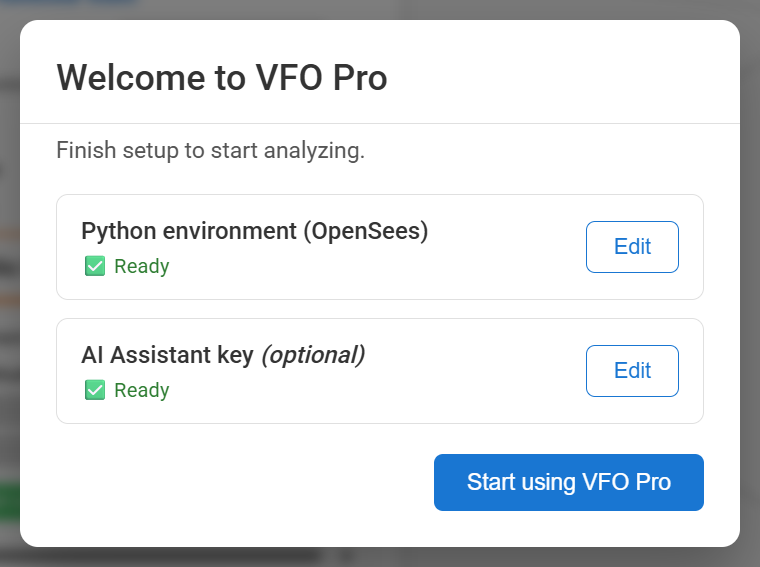
Click it to dismiss the checklist for good. If you skipped the AI key, that's fine — it's optional and won't block you.
Ready to build something? Continue to Build Your First vfopro Model — you'll model a frame, run a real analysis, and view the results.
Troubleshooting
“Failed to test Python environment”
This usually means the selected conda environment doesn't have a working Python at the expected path. Double-check the Environment dropdown in the Python tab and click Refresh.
OpenSeesPy is missing after Test Env
Install it manually instead of relying on auto-install:
pip install openseespy numpy matplotlib
# or, with conda:
conda install numpy matplotlib
conda install -c opensees openseespy
“Your trial has ended” on the sign-in screen
Your trial period is over. Choose Upgrade Now to go to the pricing page, or Log Out to sign in with a different account.
I can't find Settings
There's no menu bar or keyboard shortcut for Settings — it's the gear icon in the bottom-right corner of the main window.
Still stuck? Email us with what you tried and we'll help.
Change these later
The gear icon in the bottom-right corner always reopens Settings. You can change your Python environment, AI provider and key, or any other option (Analysis, Skills and General tabs) at any time. Nothing here is a one-time, irreversible choice.
Last updated September 19, 2026 · applies to vfopro 20260918.0.0 or later