
What it can and cannot do
The assistant works inside your open model. It reads what is there, then creates or changes it for you.
It can:
- Create materials, sections, stories, nodes, beams, columns and supports.
- Assign sections to elements, and change only the members you have selected.
- Define load patterns and load cases, and apply loads.
- Run Check Model and explain what it finds.
- Answer questions about the last analysis, such as the modal periods, and show a mode shape.
It can’t:
- Save, open or export files. You do that yourself.
- Browse the web or read anything on your disk, except a file you attach to a message.
- Guess engineering values for you. It will ask for material properties, section sizes and load magnitudes, or assume a default and show it to you first.
- Reliably run a long analysis. Start those from the Analysis panel (see Use it safely).
The assistant is a fast pair of hands, not a checker. Always look at what it built before you rely on it.
Before you start
-
Add your key. The assistant needs an API key from an AI provider. If you have not done this yet, follow How to Create LLM API Keys.
-
Save your model first. Use Home › Save As and give the model a name. Analysis needs a file on disk, and vfopro autosaves over that file every five minutes, so a saved copy from before the assistant starts is your safety net.
-
Know your undo limits. vfopro remembers only the last 5 changes, and Ctrl+Z does nothing while the cursor is in the chat box. Click in the 3D view first if you need to undo.
Tour of the chat panel
Open the chat with the round button at the bottom right of the window.
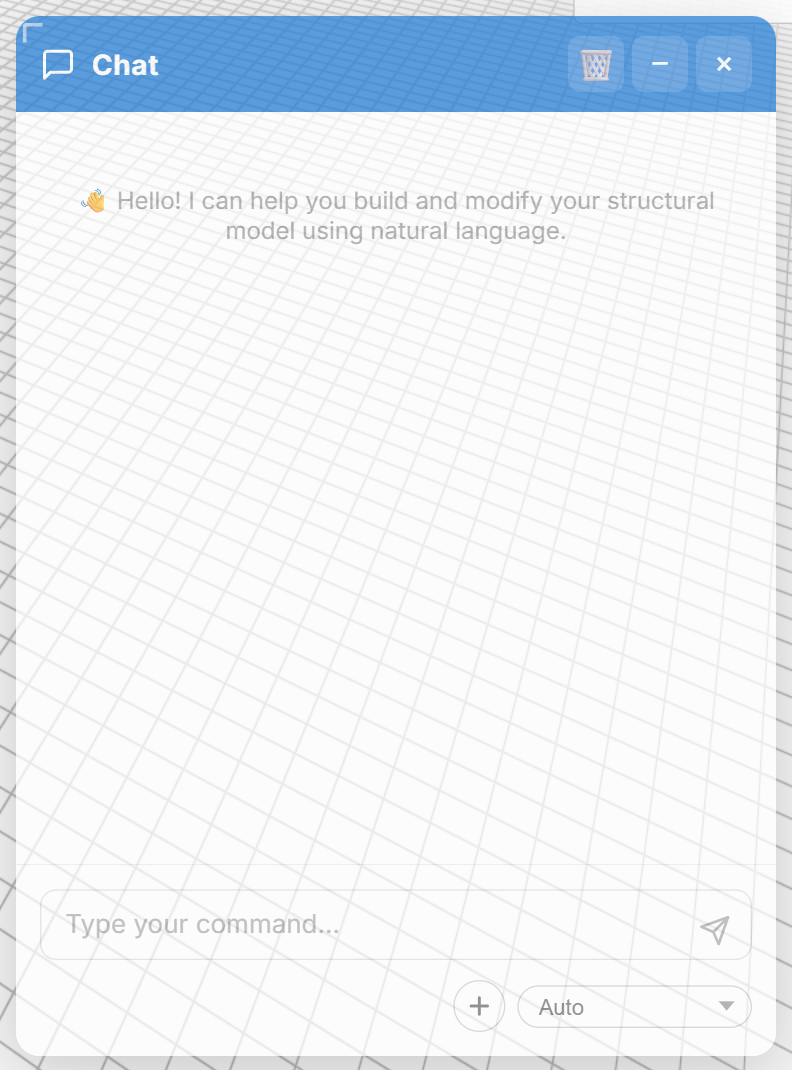
- 1 Clear (Ctrl+L) starts a fresh conversation. The assistant only remembers the most recent part of a long chat, so clear it between unrelated jobs.
- 2 Minimize and 3 Close hide the panel. Drag the header to move it, and drag a corner to resize it.
- 4 Message box. Enter sends; Shift+Enter starts a new line. Type
@to pick a skill. - 6 Add attaches images and text files (
.txt,.md,.csv,.json,.log). You can attach up to five at once. They are sent with your first message of a task. - 7 Approval mode. Auto asks you to approve the plan once, then runs every step. Approve per step pauses before each step. Leave it on Auto for this guide; the task panel below has its own Step by step button.
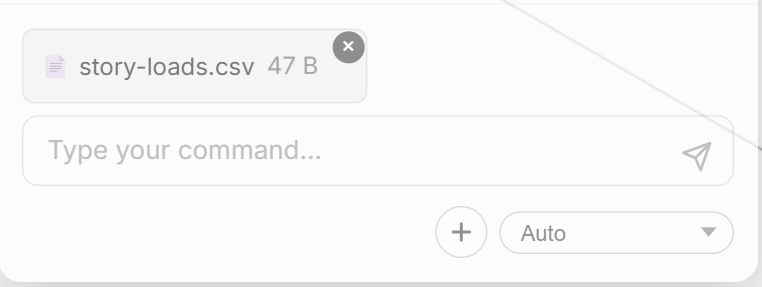
Try it: attach a small CSV of story loads and ask “What is the total of the extra dead load column in the attached file? Just tell me the number.” The assistant read the file and answered correctly.
The panel fades when the pointer is elsewhere and becomes solid when you move over it, so the model stays visible behind it.
How a request runs
For a job with more than one step, the assistant does not start straight away. It opens an Assistant task panel and waits for you. Nothing changes in your model until you approve.
-
Answer the questions. The Questions tab holds only what the assistant could not safely guess, with defaults already filled in. Change what differs. Use defaults accepts them all.
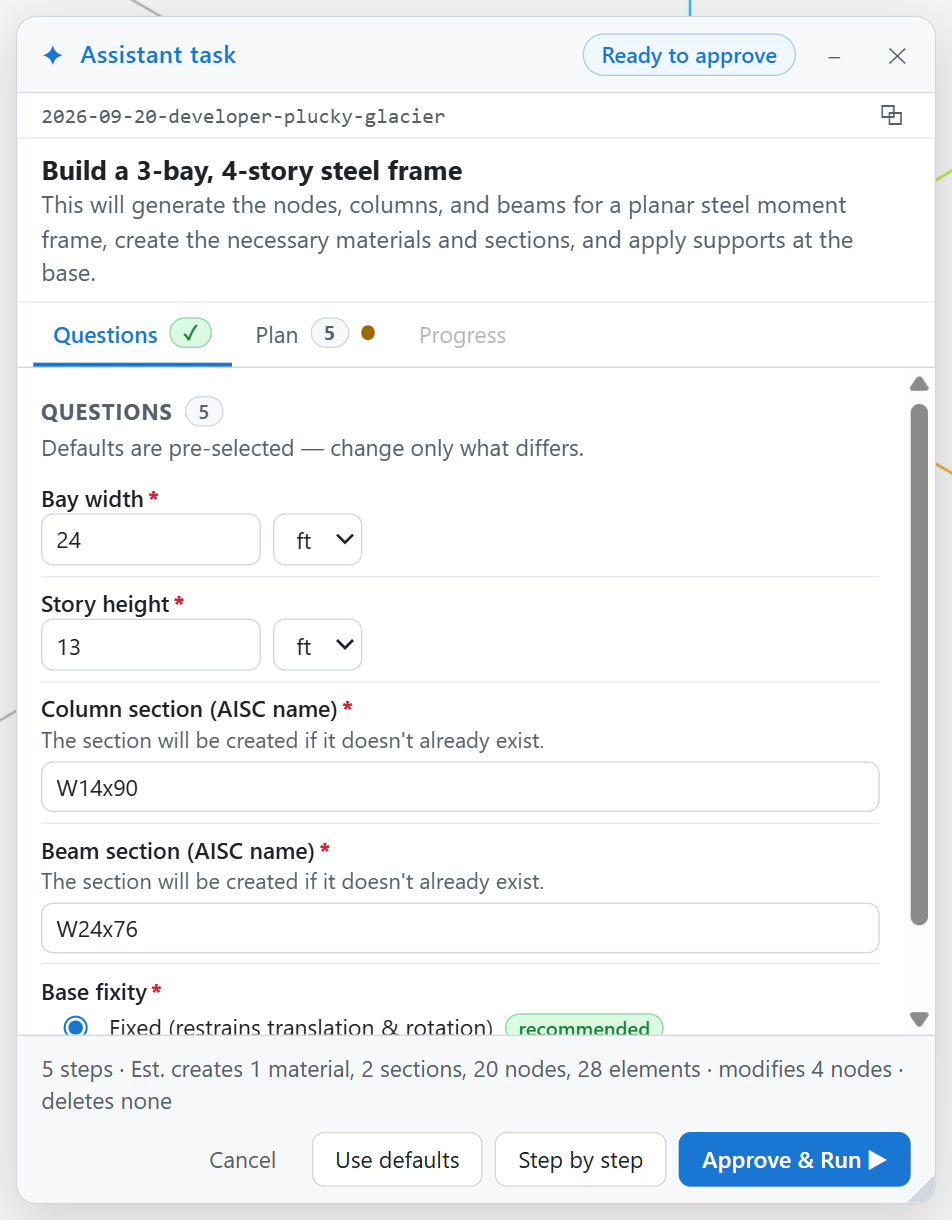
The Questions tab. A specific prompt gets few questions; the defaults come from what you typed. -
Read the plan. The Plan tab lists the assumptions it made (click a chip to change one) and the numbered steps. Untick any optional step you do not want. The Estimated scope line is the assistant’s own estimate of what it will create and change; treat it as a guide.
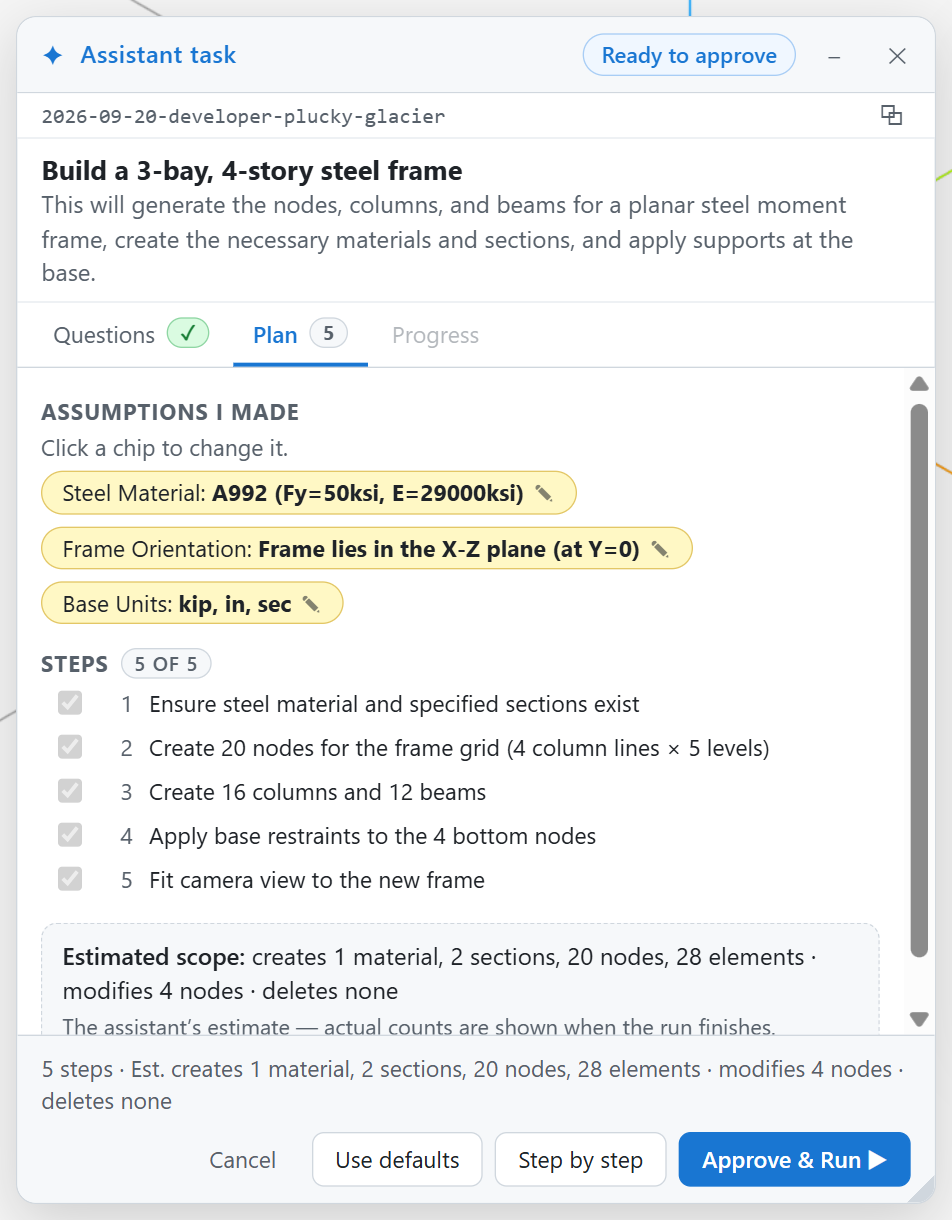
The Plan tab. Review the assumptions before you approve. -
Choose how to run. Approve & Run (Ctrl+Enter) runs every step. Step by step shows the code for each step and waits for your go-ahead. Choose Step by step whenever a plan deletes or overwrites something. Cancel discards the task.
-
Watch progress. The Progress tab ticks each step as it completes and ends with the assistant’s summary and how long the run took.
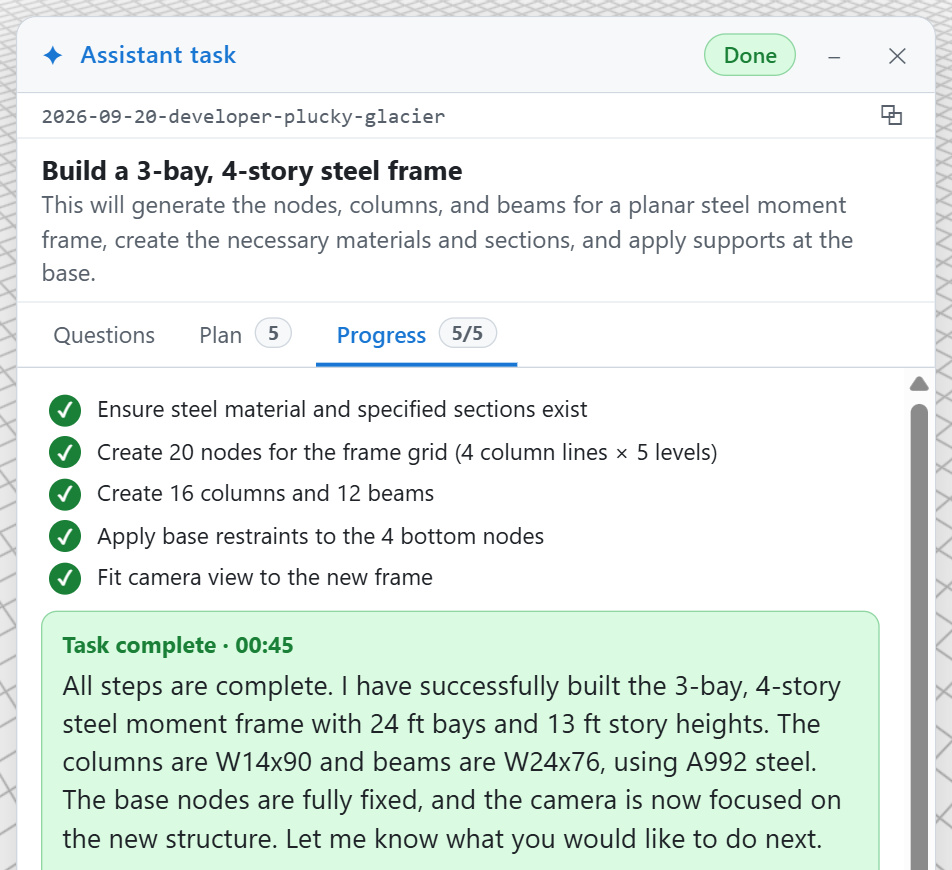
A finished task. You should see: the status chip change to Done, and the new members in the 3D view. Click Mark finished to close the task.
Stop, pause and continue
- Stop task ends the run, but only after the current step finishes. It is not instant.
- Eight steps per turn. The assistant works for at most eight steps before it pauses and shows “Reached the 8-step limit for one turn.” Type
continuein the chat and it picks up where it stopped. A long build often does this. - If a step fails, a card explains the error and offers Ask to fix, Retry and Skip. Start with Ask to fix.
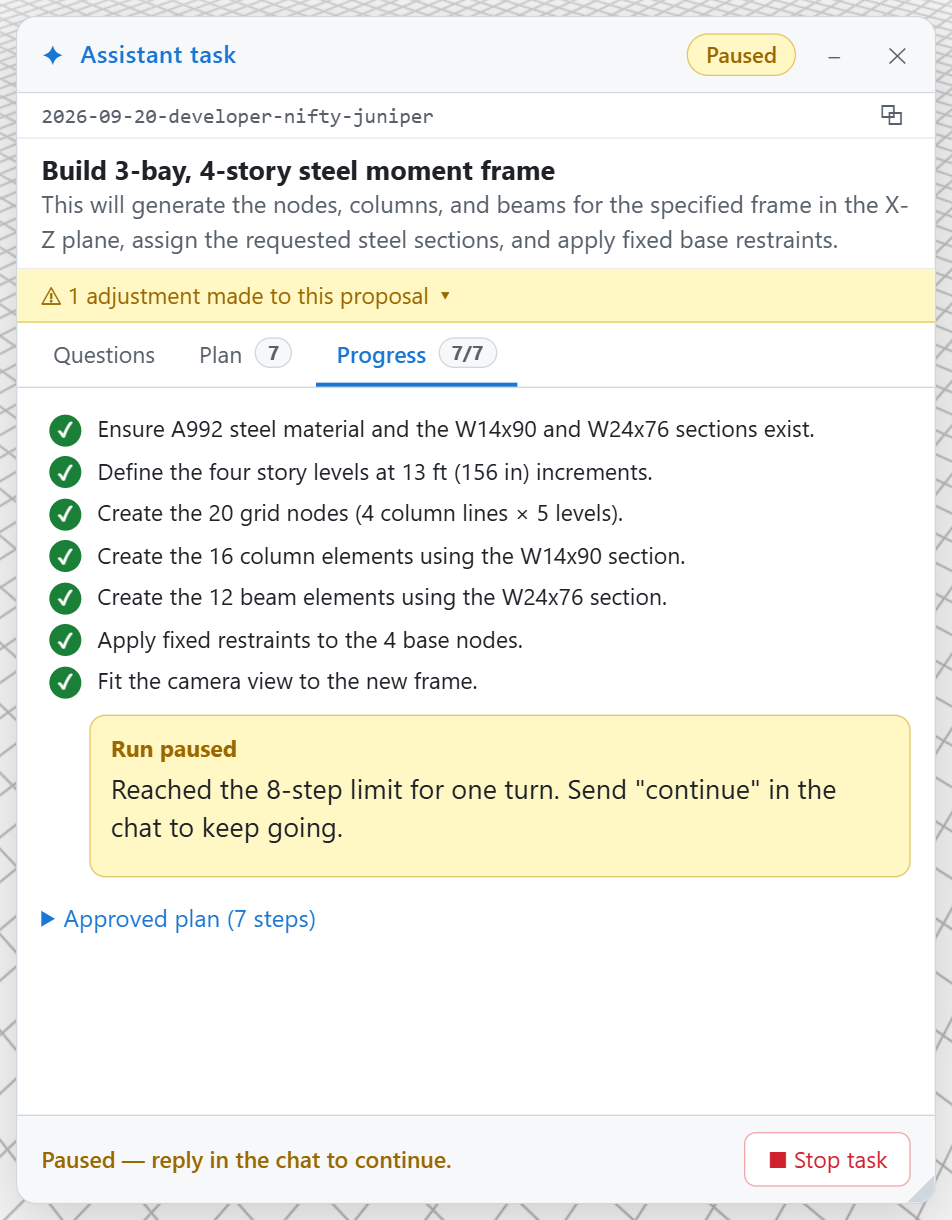
A one-step request (“change the Modal case to 8 modes”) runs straight away and replies in the chat. You may first see a code preview with an Execute Code button; click it to run. Sometimes the assistant answers a bigger request with an older plain plan card instead of the task panel; approve it the same way.
Prompts to try
Each prompt below was run against a live provider. Use them as they are, then change the numbers. Start from Home › New Model unless a prompt says otherwise.
Specific beats vague
The more you state, the fewer questions you are asked.
This opens a panel with about nine questions (bays, stories, sections, loads and more). It works, but you are doing the design work in a form.
This gets a short plan with no questions. The assistant creates the 20 nodes, 16 columns and 12 beams, assigns the sections and fixes the four base nodes. It may pause at the eight-step limit; reply continue.
A new model already has SteelA36 with its unit weight. If you let the assistant create its own steel, it gets no weight, so the model has no mass and a modal analysis fails. Say “use the existing SteelA36”.
Change only what you select
Select the members first (see Build Your First vfopro Model), then say “selected”. Here the beams and columns of the frame are both selected.
The beams change to W27x94 and the columns keep their section. Confirm by colouring the model by section or by querying an element.
Loads and load cases
A load pattern named Live appears with four nodal loads of 5 kip acting downward.
The assistant edits the existing case and replies with the new number of modes.
It adds the case and lists every case, including Modal6. “Then list… to confirm” is a good habit; see below.
Check the model and read results
You get a plain-language summary of the warnings, for example that the model is unsaved or has no mass source.
Run the analysis yourself from the Analysis panel, then ask:
The first returns three periods in seconds. The second opens the mode-shape view.
Habits that get better results
- State units, names and values. “24 ft”, “W14x90”, “5 kip”, “SteelA36”.
- Select first, then say “selected”. Otherwise the assistant has to guess which members you mean.
- One change at a time. Build, look, then load, look. Small tasks are easy to review and to undo.
- End with a check. “…then list the load cases” or “…then run Check Model” makes the assistant prove its own work.
- Verify in the model. A reply that says “done” is not the same as the model changing. Look at it.
- Clear the chat (Ctrl+L) between unrelated jobs.
Teach it your standards with skills
A skill is a short markdown file of your own rules, such as naming conventions. The assistant reads it when you ask for it, so you write the rule once instead of repeating it in every prompt.
Open Settings › Skills. Each skill is a subfolder of the skills folder with a SKILL.md file inside. Tick a skill to make it available, and click Edit to change it.
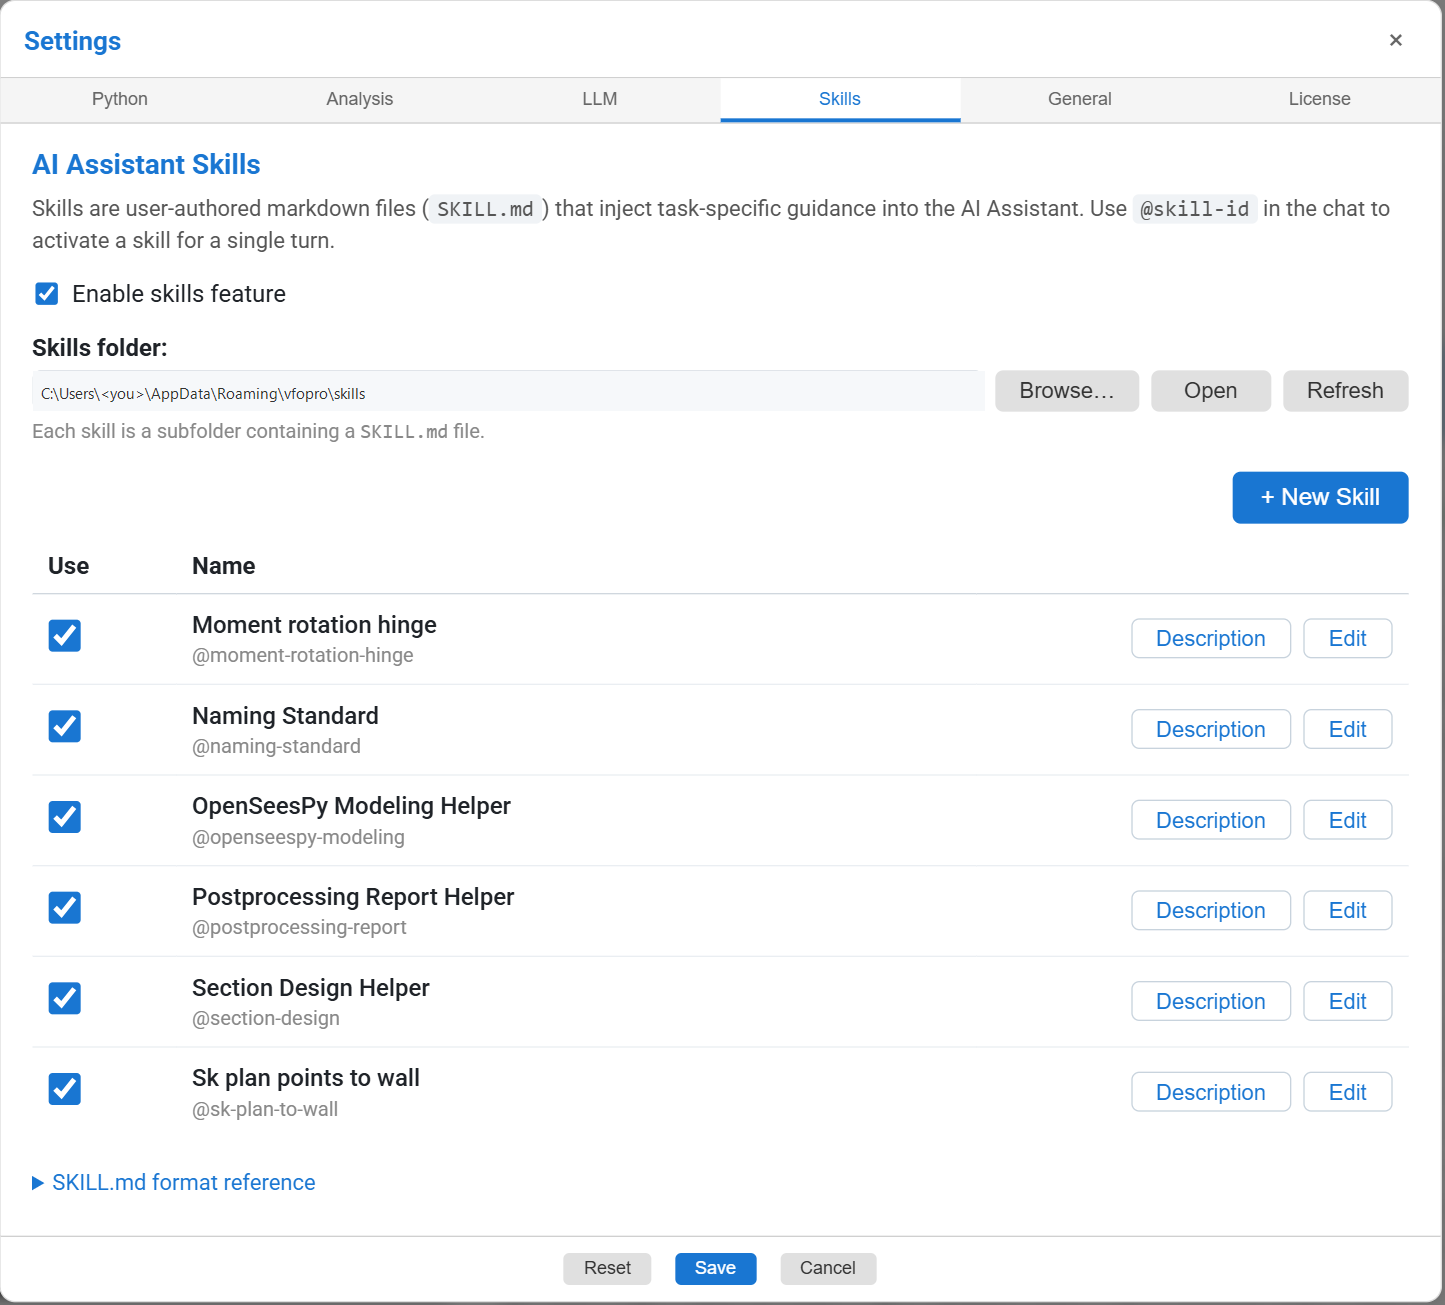
@.To use one, type @ and its name in the chat box, then your request. It applies to that message only. Here is a small skill you can copy. Click + New Skill, or create the folder naming-standard and save this as SKILL.md inside it, then click Refresh.
---
name: Naming Standard
description: Our naming rules for load patterns. Use whenever you create or rename a load pattern.
alwaysOn: false
version: 1
---

# Naming Standard

Follow these rules whenever you create a load pattern:

1. Start every load pattern name with `LP_`, followed by the type in Title Case.
   Examples: `LP_Dead`, `LP_Live`, `LP_Wind`.
2. Never create a load pattern without the `LP_` prefix.
3. After you create it, tell the user the exact name you used.The assistant replies that it is following the naming standard and creates a load pattern named LP_Wind, then tells you the exact name. Without @naming-standard you would get whatever name it picks.
The assistant follows a skill as it would follow any instruction, so still check the result. The starter skills that ship with vfopro are examples; read one before you rely on it.
Use it safely
- Expect it to check first. Asked to load a node that did not exist, the assistant did not fail: it stopped, explained, and offered options. Answer in the chat and it carries on.
- Read the plan before approving. Check the assumptions and the step list. Untick optional steps you do not want.
- Use Step by step for anything destructive. There is no hard block on steps that clear or delete parts of the model.
- Save first, and keep a copy. Autosave overwrites your file and undo only goes back five changes.
- Run Check Model after big changes, and ask the assistant to explain any warning.
- Run long analyses from the Analysis panel. The assistant’s own commands stop after 30 seconds, so a real analysis started from the chat can be cut off or reported as failed.
- Know what leaves your computer. Your messages, the model information the assistant needs to answer (names, counts, the ids of selected items), the results of each step, any values it queries, and anything you attach are sent to your AI provider under your key. Modelling, analysis and results stay on your machine. See How to Create LLM API Keys for how the key is stored.
If something goes wrong
| What you see | What to do |
|---|---|
| The chat says the assistant is not configured, or “No API key found”. | Add your key in Settings › LLM and click Test Connection. If the warning stays after saving, close and reopen the chat panel. |
| An error such as “Your prepayment credits are depleted”. | That message comes from your provider, not vfopro. Add credit or a billing method in the provider’s console, or switch to another provider in Settings › LLM. |
| “Reached the 8-step limit for one turn.” | Normal for a long task. Type continue. |
| The assistant repeats the same step and then stops. | It stops itself when it makes no progress. Say what it should do differently, or rephrase with more specifics. |
| A step fails. | Use Ask to fix. If it fails again, rewrite the request as smaller steps. |
| The task panel shows a warning sign next to Modifies but the edit happened. | The panel only counts things added or removed, so property edits (a section change, for instance) can show as zero. Check the model itself. |
| The reply says “done” but the model looks unchanged. | Ask it to list or query what it just created. If it is missing, repeat the request with more detail. |
| Stop does not act at once. | It takes effect after the current step ends. Wait for that step, then reply with what you want next. |
Last updated September 20, 2026 · applies to vfopro 20260918.0.0 or later