
Find the files
Both are written into the folder that holds your saved model, and both are named after the model:
MyModel_ospy.py | The OpenSeesPy script. |
MyModel_ODB\ | The results folder (ODB is short for output database, but it is an ordinary folder of text files). |
vfopro needs a saved model to know where to write. If you see Please save the model first, use Home › Save Model.
Generate the script without running it
-
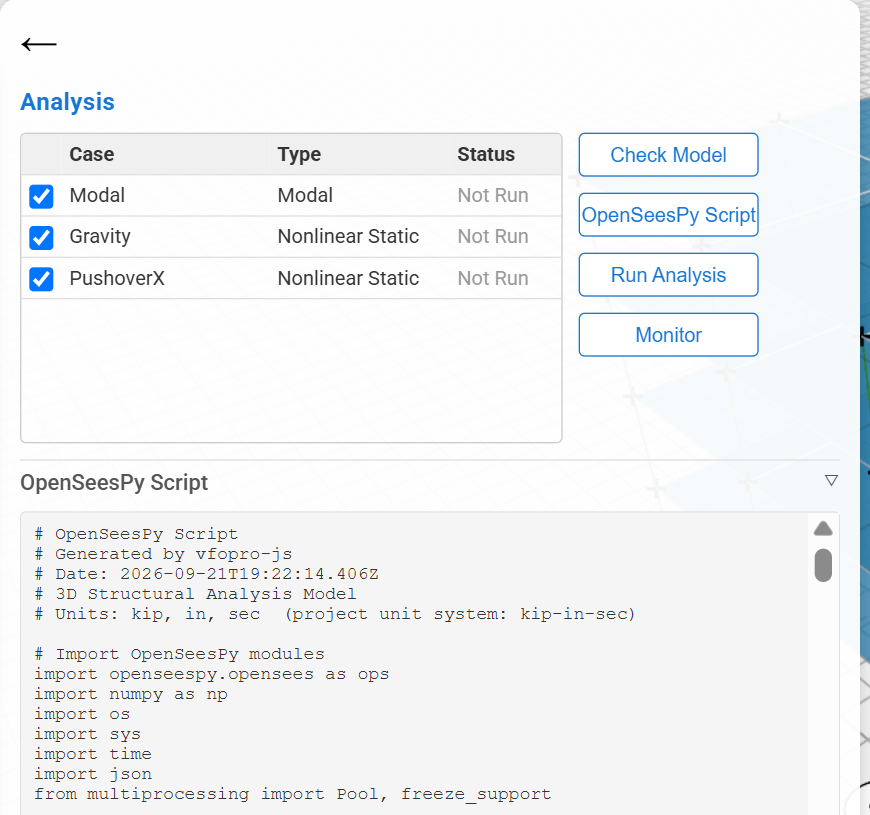
Open the Analysis panel and tick the load cases you want in the script.
-
Click OpenSeesPy Script.
You should see: a status line Script saved: followed by the full path ofMyModel_ospy.py, and a collapsible OpenSeesPy Script section that shows the text.
The script is overwritten each time you click OpenSeesPy Script or Run Analysis. Copy it first if you want to keep a version.
Read the script
Open MyModel_ospy.py in any text editor. From top to bottom it contains:
- a header that names the units (kip, in, sec) and imports OpenSeesPy;
- a function that builds the model: materials, sections, nodes, elements, supports and constraints;
- one function per load case, with its loads, its analysis settings and the run;
- a block at the bottom that runs the cases in order.
Here is a shortened excerpt from a pushover case. Lines that start with ops. are standard OpenSeesPy commands, documented in the OpenSeesPy manual:
# Load Case: PushoverX
ops.pattern('Plain', 2, 1)
ops.load(23, 1.000000, 0.000000, 0.000000, 0.000000, 0.000000, 0.000000)  # Node 23
ops.load(38, 2.000000, 0.000000, 0.000000, 0.000000, 0.000000, 0.000000)  # Node 38
...
ops.constraints('Transformation')
ops.numberer('RCM')
ops.system('UmfPack')
ops.algorithm('ModifiedNewton')
ops.integrator('DisplacementControl', 68, 1, 0.1)
ops.test('EnergyIncr', 0.0001, 1000)
ops.analysis('Static')- Node numbers in the script are the node numbers you see in vfopro. Element numbers can differ, because one member in vfopro can be written as more than one OpenSees element.
- Lines that start with
vfopro.are vfopro helper calls that set up the result files. Leave them as they are. - Comment lines that start with
# WARNINGmark something vfopro skipped, such as a self-weight it could not compute. Search the file for the word WARNING.
Run the script yourself
The script is ordinary Python. Run it from your model’s folder, using the same Python environment that vfopro uses (the one you tested in Settings › Python).
-
Copy the whole model folder somewhere else first. The script writes its results into the folder it is run from, and it would overwrite the results vfopro reads.
-
Open a terminal in the copy, activate the environment and run the script. With a conda environment called
vfopro:conda activate vfopro python MyModel_ospy.py
MyModel_ODB folder next to the script, with one subfolder per load case you ran.The script needs OpenSeesPy and the vfopro helper package that Test Env installs. A colleague can run it only in an environment set up the same way. To hand your work to a reviewer, send them the model file and let them run it in vfopro.
Edit a copy, not the original
You are free to change a copy of the script, for example to try a different solver setting, and run it. Keep these in mind:
- vfopro will not read your edits back into the model. Change the model in vfopro, or accept that the script and the model have separated.
- Results from an edited script are not covered by vfopro’s checks. Compare them against the unedited run before trusting them.
- Do not rename or delete the result files if you want vfopro to display them.
Read the results
Results are plain text: one row per recorded step, numbers separated by spaces, everything in kip and inches.
Nodes.out | One row per node: node number, x, y, z. |
<Case>\NodeDisp_All.out | One row per step. The first column is the step’s load factor or time; then ux, uy, uz for each node, in the order of Nodes.out. |
<Case>\Reaction_All.out | Same layout for the support reactions Fx, Fy, Fz, one triple per restrained node. |
ModeShapes\ModalPeriods.out | One row per mode: mode number, period in seconds. |
The other files in each case folder hold element forces and hinge results. vfopro reads them for you in Post Processing.
To load a result in Python, run this from your model’s folder (it needs numpy, which your environment already has):
import numpy as np

odb   = "MyModel_ODB"
nodes = np.loadtxt(f"{odb}/Nodes.out")                  # node, x, y, z
disp  = np.loadtxt(f"{odb}/Gravity/NodeDisp_All.out")   # step, then ux uy uz per node

node_id = 68
i  = list(nodes[:, 0].astype(int)).index(node_id)
uz = disp[:, 1 + 3*i + 2]                               # vertical displacement, every step
print(uz[-1]) # value at the last stepReaction_All.out for the last step: for a gravity case they equal the total vertical load applied to the model.Your responsibilities
- The script is a record of what was analysed. Keep it with the model file, and note the vfopro version, for any assessment you may need to defend later.
- Reading the files is a good way to check a result independently, but hand calculations and reasonableness checks are still yours to do.
- The engineer of record remains responsible for the assessment.
Last updated September 21, 2026 · applies to vfopro 20260922.0.0 or later